|
uvi-script
Musical event scripting with Lua
|
|
uvi-script
Musical event scripting with Lua
|
Welcome! This tutorial will guide you through creating your first functional uvi-script. We'll build a vibrato effect, and in the process, you'll learn the fundamental concepts of scripting in the UVI environment.
uvi-scripts are powerful modules written in the Lua programming language that can process and generate musical events in real-time. Think of them as MIDI effects on steroids.
For this tutorial, you don't need to be a Lua expert, but some programming basics will be helpful. If you want to learn more about Lua, the online book Programming in Lua (for 5.1) and the official Lua 5.1 Reference Manual are excellent resources.
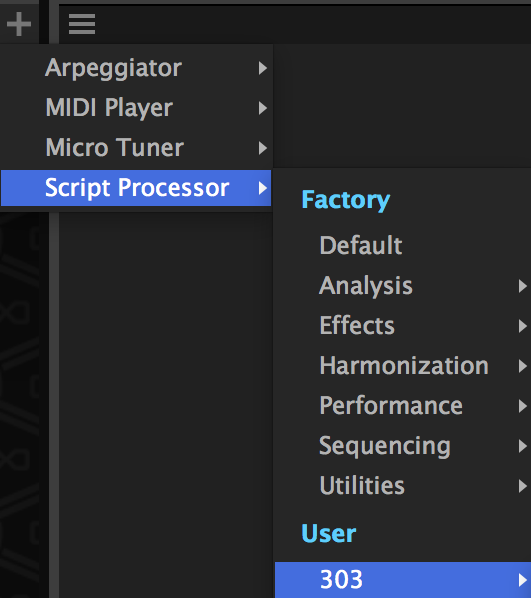
First, you need a ScriptProcessor module in your instrument.
vibrato.lua.vibrato.lua file you just created. 
You now have a valid, empty script loaded. As you make changes, remember to click Reload to apply them.

onNoteuvi-script is event-driven. This means it waits for something to happen (like a note being played) and then reacts to it. We define our reactions inside special functions called callbacks.
The most important callback is onNote(e), which runs every time you play a note. The e argument is an Event object that contains details about the note, like its pitch and velocity.
Let's start with the simplest possible script. Add this to your vibrato.lua file:
Click Reload. Now, when you play a note, the script receives it, postEvent(e) forwards it, and you hear the sound.
A vibrato is a continuous modulation, so we need a loop that runs as long as the note is held. We can do this with a while loop and the isNoteHeld() function.
We also need to get a unique ID for our note so we can modify it later. postEvent(e) conveniently returns this ID.
If you run this, you'll notice the script freezes! This is because the loop runs infinitely fast without giving the audio engine any time to breathe. We need to tell the script to pause on each iteration.
To fix the frozen script, we add a wait() command inside the loop. This function pauses the script for a few milliseconds, yielding control back to the engine. This is a critical concept in uvi-script.
Now the script runs correctly without freezing, but it still doesn't do anything. Let's create the vibrato.
To create a vibrato, we need an oscillator. We can simulate one using math.sin(). We'll also use getTime() to get a constantly running clock, which ensures our vibrato speed is stable.
The final piece is changeTune(), the function that actually changes the pitch of a specific voice.
Here is the complete logic inside the onNote function:
onNote callback runs in its own lightweight thread, managed by the engine. This means you can create a while loop that uses wait() inside onNote without blocking other notes from playing. The engine automatically handles the parallelism required for polyphony.Our script works, but the vibratoFreq and vibratoDepth are hard-coded. Let's add UI controls to change them on the fly.
We do this by replacing the variables with Knob widgets.
The key changes are:
local vibratoFreq = 4 became local freqKnob = Knob(...).freqKnob.value and depthKnob.value on each iteration to get the latest setting from the UI.
Knobs (and Sliders) accept a Mapper and a Unit that control how the widget behaves and displays its value.
A Mapper defines the curve between the widget's visual position and the actual parameter value. For example, a filter cutoff frequency spanning 20 Hz to 20 kHz sounds best with an exponential curve so that each visual increment represents the same perceived change:
Available mappers include Linear (default), Exponential, Quadratic, Cubic, SquareRoot, and more — see Mapper for the full list with formulas.
A Unit tells the engine how to format the displayed value. Instead of writing custom formatting code, just pick the appropriate unit:
See Unit for all available types (Seconds, MilliSeconds, Decibels, Cents, MidiKey, etc.).
Both can be set as properties or passed directly in the table constructor form:
When no built-in unit fits your needs, you can override the display with the displayText property — see the monoBassLine example for a complete demonstration of mappers, units, and displayText in action.
Congratulations! You've built a complete, interactive vibrato effect.
In this tutorial, you have learned several core concepts:
onNote callback.while isNoteHeld() and wait() to create continuous effects.onNote in a separate thread.postEvent() and use it with changeTune().Knob and read their .value.From here, you can experiment by changing the parameters, browse the Examples Gallery for complete scripts, or explore more advanced topics in the UI Guide and the full API Reference.